Wednesday, August 5, 2015

Walking Onions Galore, A Love Affair

It's been another amazing year with these heirloom North American native perennial onions. They're easy to propagate, don't need fertilizer, and are pest resistant. They're super easy to grow organically. I'm getting very creative with them; we haven't bought onions for a couple of years and that's a small locovore triumph for us!


In late July I harvested the top set bulbs. There are plenty for fall planting and for sharing with friends. 

At the end of July the 'parent' onions were cut back and the bed was cleaned up. Already, they're sprouting green tops again - our first salad onions of early fall. 


Here are my favorite ways to use these onions in garden and kitchen, plus a recap of our year with Thomas Jefferson's "Tree Onions."

USES
1. Inter-plant top sets with cucumber and squash vines to help hold off the squash bugs. Their strong scent confuses the bugs; marigolds make great companion planting partners with the onions. As the cuc season winds down, harvest and enjoy eating the tender green onions. If you leave a few in the bed, no worries - they'll come back next spring for an early season harvest. 

2. Mix the top sets into the fall lettuce planting in late summer for delicious and tender fall green onions. This companion planting can help deter flea beetles. 

3. Pickle the top sets! 
Look for the recipe in my previous blog post. 

4. Make a modern version of Grandma's Creamed Potatoes: Peel and steam the top sets with new potatoes until just tender, then gently stir them into a cream sauce. Top with shredded cheese and fresh parsley. YUM - A hearty and different side dish for your next barbecue.

5. Plant the top sets around the edges of your fall/winter greens bed, cover the bed with 6 mm greenhouse plastic over PVC pipe hoops and enjoy green onions all winter. 


6. Continuing from #5: In spring, allow bulbs to grow larger.

Harvest in May and use the bulbs as slicing onions; chop and freeze the green tops in ziploc bags for adding to stock. 


THE ONION YEAR
Winter: 
If your bed is set up as a low hoop house, harvest and enjoy onions from the established parent group.  If not, dream and plan how you'll change it up for next winter!
This was my harvest on Jan. 19:

They cleaned up beautifully!

Spring: 
In late February or early March, check for signs of new growth; trim and remove dead stalks.  To jump-start a dormant onion bed, put greenhouse plastic over PVC  hoops to warm the soil quicker. You'll have onions a month earlier this way. 

The winter of 2013-14 we left the bed uncovered, then added plastic in March. Our walking onions are just coming out of winter dormancy in this photo. A week later, we were harvesting fresh green onions!


SUMMER
Top sets start forming in late May, and continue to grow until late July. The stalks bend over, and the whole bed looks wild and a bit unruly! Keep them watered for larger sets.

I'm amazed I don't have a photo of this stage, but here's one from Dave Whitinger posted to Wikimedia Commons.

Summer is also the time to use top sets for companion plantings (see #1 and 2 in USES). Poke the little bulbs into the soil just to cover, and keep watered. 

In late July, when stalks in the parent bed have bent over and are drying out, harvest all top sets (or leave where they dropped in the bed if you're trying to 
increase the density of your bed). Trim back all mature stalks to 4". Water the bed if weather is dry. New sprouts will start in a week or two. Top sets can be stored in a single layer on trays in a cool dry location indoors for several weeks until ready to plant. If using for cooking, store in a closed container in refrigerator. 

FALL
Harvest newly sprouted green tops for salads and stir frys. Interplant top sets with fall greens. As winter approaches, cover parent bed with plastic over PVC hoops or simply leave the bed as is until spring. Harvest a few bulbs from mature parent bed for Creamed Onions at Thanksgiving. 

Enjoy your Walking Onions with gratitude for all of Nature's bounty. 

Tuesday, July 28, 2015

Pickled Walking Onions

Yesterday I harvested our walking onion tops, and there were lots! I took out the largest 100 or so for fall planting, and here's what was left: 


There are plenty to share with friends, and to make pickles. My favorite recipe is a refrigerator pickle that we slice and use as salad topping. 


I admit, the hardest thing about this recipe is peeling those tiny onions, but it's worth the effort!

Sweet-Hot Walking Onions
Onion topsets to fill 8 oz jar, blanched and peeled
2/3 cup rice vinegar
1tbsp honey
1/2 tsp mustard seed
1/4 tsp turmeric powder 
1bay leaf
1 dried whole cayenne pepper, cut in half

Mix vinegar, honey, salt, herbs and spices; heat to simmer. Pour over onions in 8 oz canning jar. Cap with plastic lid; let stand on counter until cooled. Store in refrigerator, shaking occasionally. Ready to enjoy in 1week.

Sunday, May 24, 2015

Let's Make Lotion

With all the chemicals in commercial lotions these days, I'm truly grateful for this method I adapted from Rosemary Gladstar's lovely book, Herbal Recipes for Vibrant Health. My skin loves this herbal lotion, and I love knowing exactly what's in it.

My Comfrey-Calendula Lotion starts with herb-infused olive oil.  Pick fresh comfrey leaves and flowers and calendula blossoms on a sunny day, chop and pack lightly into a canning jar. 


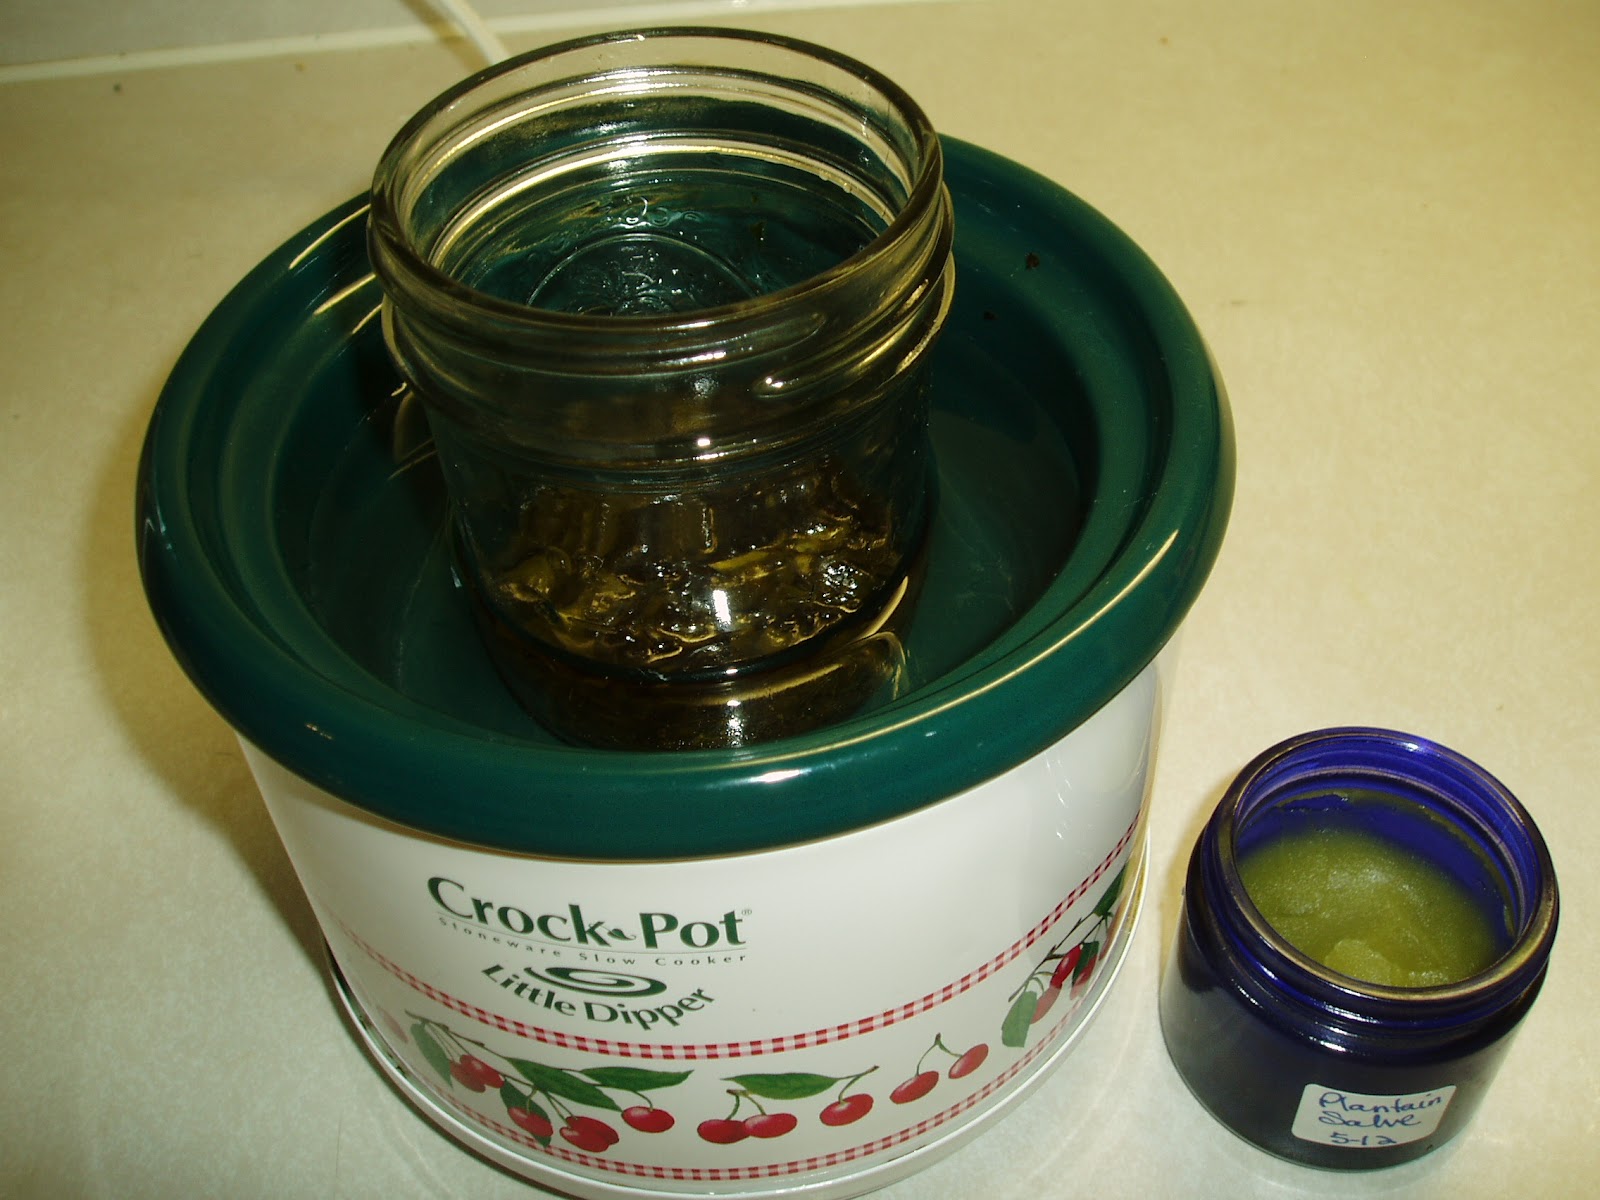
Add olive oil to cover. Place jar in crock pot, add hot water around jar and let slowly heat for 12-24 hours. Here's a pic of that set-up in my blog entry, "Plantain, the First-Aid Weed:"

Place 4 oz. infused oil, 1/2 oz. beeswax and the contents of a few vitamin E capsules in a Mason jar in a small saucepan; add water around jar. Stir over low heat until beeswax melts. Pour into blender; let cool slightly. Add a few drops essential oils and flower essences if you like. Stir together rose water and aloe vera gel to make 1/4 cup and pour slowly into blender with motor running.  Blend until just thickened. Pour into clean jar and store in refrigerator. 


Still not sure how to make lotion, or just want to watch the process your first time? Message me or post a comment here to sign up for my Herbal Intensive. It's a fun and jam-packed afternoon of life skills and learning in my garden with the plants. 

Saturday, March 15, 2014

These Herbs are Waking Up

On my daily walk about the yard today, I found these herb friends just coming out of their winter sleep. To my neighbors, most of these guys are weeds but to my family they're superstars of the spring garden, providing cheap and nutritious food and remedies.  


Stinging Nettle, a vitamin and mineral powerhouse, is used in 

infusion (a strong tea infused overnight) for adrenal exhaustion and in tinctures as a 
remedy for allergies. The young tops are tasty steamed or sauteed like spinach.


Young Dandelion leaves will be ready to saute next week.  This one is growing
under greenhouse plastic, so has a head start on those outside the beds.
Rich in minerals, Dandelions give a healthy springtime boost to the liver and
kidneys after a season of rich, warming holiday foods.


Bloody Dock (Rumex sanquineus) is astringent, tonic and a rich source of iron.
Add tender young leaves to salads for a tangy flavor. Due to the
oxalic acid content, avoid Bloody Dock if you have a history of kidney stones.


The first leaf of Victoria Rhubarb unfolds under greenhouse plastic. Challenging to grow in Kansas,
Rhubarb requires adequate sun but needs protection from extreme summer heat. Rhubarb contains
antioxidants, vitamins and minerals, and can help maintain regularity and lower cholesterol.
AND - it adds an amazing springtime flavor when mixed into apple or berry crisp!


 Here's one more friend who has grown faithfully in the gardens all winter, even under snow.


Winter Chives - despised by some as a lawn weed - go dormant in the heat of summer,
then begin to grow in late fall as temperatures drop.  They produce tender,
phytonutrient-rich tops for dressings and garnish all winter long
while traditional chives lie dormant underground.

Friday, March 14, 2014

Ready for Spring

My seedlings are growing, we've had some warm days, and I'm itching to play in the dirt!  I love spring planting time; we've kept ourselves busy indoors and out as we dreamed of warmer - and longer - days.

INDOORS:

Our kitchen growing center consists of bargain rack and
shelves from Home Depot, with inexpensive grow mats
and humidity tent from Indoor Gardening Supplies.com.
On the rack, above:  collards, broccoli raab, red mustard, arugula, blue kale, Tuscan black kale, calendula, borage, and lettuces. All of these seedlings are cold-season plants that will be happy outdoors soon after Spring Equinox.


OUTDOORS:

Our perennial onions get a head start at the end of winter with greenhouse plastic
over PVC hoops.  Next week, we'll start harvesting green onions from this bed.


Onions are high in vitamins and phytonutrients for immune-boosting and detoxifying benefits.  Perennial Walking Onions are super easy to grow and multiply quickly; we started this bed 2 years ago with a single clump purchased at the farmers' market. 


Chives grow quickly in late winter weather under an overturned 
aquarium, my substitute for an expensive glass cloche.

Chives are high in vitamins, minerals, and antioxidants that promote heart and bone health and fight cancer.  Once established, perennial herbs such as chives are very easy to grow and can be long-lived.  Ours came from my mother's garden, and were started by my grandmother nearly 40 years ago.


Thursday, July 25, 2013

Everlasting Kale?

The garden holds many surprises.   I'm sharing my seed-saving tips for cabbage-type plants again, with an update on one incredible "dwarf" Blue Curled Kale plant.  
Our beautiful 3-year-old kale plant - July 25, 2013.


Never did I expect that this plant would still be with us, but it's here and going strong after 3 summers and 2 cold and snowy winters.  We’ve had 2 years of seed production from this everlasting friend, and its blossoms nourished many bees and pollinating flies again this spring.  Who would have known that a member of the humble cabbage family would have such longevity programmed within.  I'm wondering if the seeds will have this characteristic, too. 

Kale Blossoms
My kale friend thrives in a well-developed food web in our garden, where Mother Nature has some built-in pest controls.  This single plant fed generations of white cabbage butterflies; I use it as both a lure and a relocation plant, saving the new crop of kales in the vegetable garden from being ravaged by waves of voracious caterpillars.  Those "pesky" butterfly larvae feed the birds - this kale is regularly visited by cardinals and house finches, who gobble up the fat worms. Predatory wasps also hang out in the kale, where they lunch on plant-eating insects.  Today, I pay tribute to one surprising plant friend and agent of biodiversity in our organic gardens. 

SAVING SEEDS MAKES GARDENING AFFORDABLE

Kale seeds are ready for  harvest - July 18, 2012.
July 18, 2012:  My organic Blue Curled Kales shared a bountiful seed crop this week. I grow out just one member of the cabbage family each spring, since they happily cross-pollinate with their cousins. Kale is a biennial which grows a stout rosette the first year, then sends up a flowering stalk the second. I started these plants from Botanical Interests Seeds back in January of 2011. When 3 of these guys lived through last winter, I knew we’d get seeds this season.  
The tall flower stalks fed countless bees and butterflies this spring while adding structural interest in the flower garden. When kale is ripe, the pods turn brittle and shatter easily, releasing the dark colored seeds. Immature pods are soft and pliable. Resist the urge to harvest before the pods are brittle; they may mold due to their higher moisture content and when planted later on, fewer seeds will germinate.  To harvest, hold a bowl under the seed pod and rub it open to release the seeds into the bowl.  Remove the bits of pod, let the seeds sit in the bowl on your counter for a day or two to make sure they’re dry, then package in paper envelopes and label with seed type and date. When properly harvested and stored in dry, dark conditions like a closet shelf, kale seeds can be kept for up to 5 years.

Kale Seeds

I harvested nearly 1 oz. of seed in about 10 minutes last night.  That’s the equivalent of 9 seed packets in the store!  At $1.60 a pkt, I have $15 worth of seed in this batch.  As we learn to close the loop to our own sustainability through activities such as seed saving, gardening becomes both affordable and empowering.  Happy Harvesting!

If seed saving isn't your thing yet, seed from this very plant is currently for sale on my Healing Garden Herbs Etsy shop.  Happy Shopping!

Saturday, June 15, 2013

Lettuce in Hot Weather

Lettuce is a cool season annual. When the weather turns hot, it becomes bitter and inedible so here in Kansas lettuce season is nearly over.  Since we still have lots of lettuce in the garden, I’m keeping it tender and sweet with a couple of tricks.  

PVC hoops, attached to the beds with pipe bands, are perfect supports.

Mid-morning just before the sun hits the bed, I cover it with old white sheets, then soak the sheets with the garden hose. Evaporation and shade cover keep the lettuces cool.  In the late afternoon when our trees shade the bed, the sheets are removed. 


Our lettuce bed in cool May weather.
We're growing Forellenschluss, Slobolt, Red Sails, and Buttercrunch.  Forellenschluss is least heat tolerant so I'm using it up first.  Slobolt will be used last, to see if it lives up to its name. 


Slobolt lettuce under shade cover.


Buttercrunch head grown from seed saved last year.
I harvest in the early morning, when the leaves are crisp and least bitter.  All leaves are cut from the stem and plunged immediately into a bowl of cold water. They stand for 10-20 minutes to bleed out the latex, the bitter white juice. I drain the water out of the bowl, cover loosely with a plastic bag, and put immediately in the refrigerator.  Lettuce prepared this way is delicious and keeps well for about a week. 

Wednesday, April 17, 2013

Foraging for Dinner

I really wanted fresh vegetables for dinner tonight, but it's a cold and rainy spring in Overland Park and my garden grows slowly.  Luckily, many wild plants share our outdoor spaces, so I did a bit of foraging in our organic yard and came up with nettle tops and dandelion buds.  

My nettle bed in early April. The tops are very tender and mild this time of year.

Nettle stems and leaves in steamer. They cook quickly.
A quick steaming turned the nettle leaves and stems into a delicious dish reminiscent of spinach with asparagus. Nettle provides a healthy serving of protein, minerals, B vitamins, vitamin C, and vitamin A while nourishing the adrenals, kidneys, digestive system and lungs.  I saved the steaming water, now infused with vitamins and minerals, to spray on my seedlings for a mild fertilizer boost, and gave my dog a tasty treat of fresh nettle greens (I admit, he begged for it).  Plants, animals and people all benefit from the power of Nettle!

Fresh dandelion buds ready to saute.


I cooked the dandelion buds my favorite way: sauteed in garlic butter with sea salt, and they were YUMMY.  Dandelion provides minerals, vitamin A, vitamin C, and B vitamins, and is nourishing to the lymph and digestive systems. It is especially restorative to the liver and is considered a spring tonic.
A simple and very nourishing plate of foraged vegetables.


Once again, I encourage you to eat your (organic) weeds!  They're high-quality, FREE food available to everyone willing to forage.  

Saturday, March 23, 2013

Transplanting Veggies....Or Not


OH, BRRR…..The first day of Spring brought Winter weather this year.  Back in January when I optimistically started my cold-season crops, I thought this was the week I’d move everyone outdoors.  But here in Kansas City, we’re experiencing snow and night-time temps in the low 20’s.  Even with hoop houses over them that’s extreme for seedlings whose first 6 weeks of life have been on a heat pad under warm lights.
 
Regardless of outdoor conditions, it’s time to act:  my seedlings have simply run out of nutrients in their tiny paper pots, as evidenced by leaves that are turning yellow and red.  They need some fresh soil to sink their roots into!  
Broccoli Raab and Red Mustard ready for up-potting.
The only sensible thing to do: keep those babies indoors for a few more days - weeks, maybe? - and put them in larger pots. I spent a minor fortune on ProMix in recent years, so this year I decided to go outside the box and up-pot into compost from our backyard gardens.  YES it’s an experiment, and NO the ‘experts’ don’t recommend it; do those guys own stock in ProMix?  My raised beds contain mostly home-made compost, so in 2 or 3 weeks these babies will have their feet in it anyway. 

 I've collected further evidence that using compost as a medium for up-potting could work: last year I ‘found’ all our tomato sprouts growing in the compost pile, so I transplanted them into compost-filled starter pots where they did just fine until they grew large enough to go into Grow Boxes on the deck.  There, they flourished and provided us with a steady supply of tomatoes until frost, despite the hottest summer on record.  I’m discovering that using "sterile" potting mix for older seedlings might be more gardening myth (propaganda?) than this frugal gardener is willing to accept.  

Here’s my economical method for up-potting into your own compost:

I chose 16 oz. plastic cups as economical pots for my growing seedlings, poking drainage holes in the bottom with screwdriver and hammer.  These are sturdy, and can be washed and reused many times.


I screened my compost to remove bio-char and sticks, which go back to the compost pile since I don’t mind these healthy fillers in my raised beds.  For a screen I used the top to our burning bowl, inverted over a bucket.
Fresh compost ready to screen.

Here's what's left after screening.  I'm returning this to the compost pile.


Freshly screened compost. Beautiful!

I added ½ tsp. balanced organic fertilizer to each pot.  I used Espoma for Vegetables.  Since these transplants are greens prized for their leaves, I could have used a higher-nitrogen fertilizer, but I really didn't want the extra stem growth while they're staying indoors.


I also sprayed daily for 4 days with nettle infusion, a "secret weapon" this organic gardener wouldn’t be without!  It gives the seedlings a foliar nutrient boost while their roots adjust to the new space. After just 4 days, here are the results: truly happy transplants, growing bigger and looking stronger every day!  MYTH BUSTED!!  The important lesson here is not to be afraid to operate slightly outside of conventional ‘wisdom.’  
Broccoli raab transplants, 4 days after up-potting.
Happy and Successful Gardening, everyone!!


Friday, March 22, 2013

Chickweed Spring

Chickweed growing next to the sidewalk.

On my walks this week, I noticed our neighborhood yards are sprouting chickweed. My friend who lives in the country reported that she also has lots of chickweed coming up. It’s more of this herb than I’ve seen around here in years, and I’m excited that Stellaria is back. Mother Nature often brings herbal remedies just when we need them, so I’m curious what might be in store this spring with this wild and wonderful herb.

Chickweed has a multitude of uses, both internal and external: soothing pinkeye, dissolving cysts (I’ve successfully used it to resolve benign ovarian and breast cysts for which the doctors didn’t have a treatment), calming irritation, reducing inflammation, cooling hot and aggravated skin conditions, and much more.  I use Chickweed in infused oils which I make into salves, and in tinctures.  Chickweed is also reported to make wonderful infused vinegar, which brings out her minerals for easy absorption. A welcome addition to salads, fresh Chickweed adds protein, carotenes, vitamin C, minerals, and a bright green springtime flavor.

Nearly all the Chickweed I’m seeing on my neighborhood walks is growing in the ‘public space’ between sidewalk and curb – an interesting placement for a ‘free’ remedy from the Earth. Usually, I spot Chickweed growing on neglected, tired, or unbalanced soil.  Perhaps Chickweed's gift to the Earth is restoring balance by covering bare and tired soils with her thick mat of cooling green. Maybe she also helps to improve mineral composition at the soil surface, as this is an annual that quickly goes to seed and decomposes when hot weather arrives.

Sadly, I must be very careful about harvesting from those public spaces in my area since most of my neighbors load their yards with poisonous lawn chemicals.  I caution you to know whether your harvest area is safe as well.   I’m planning a visit to my friend in the country to take advantage of this Chickweed Spring!  I hope you find some Chickweed to enjoy, too.  Happy Harvesting!

Thursday, August 2, 2012

Plantain, The First-Aid Weed

Plantain growing by my raised beds

It’s true - I actually cultivate some weeds.  Plantain is a weed that grows almost anywhere.  It’s commonly seen in lawns and sidewalk cracks; many gardeners hate it.  Plantain arrived in North America with the early colonists, and it was brought here intentionally.  For early American settlers, plantain was a valuable medicinal herb.  The Native Americans, wise in herbal ways, soon learned to use this newcomer, too.  Plantain is both a hemostatic and a vulnerary herb: it stops bleeding and it helps tissue regenerate while easing the pain associated with injury. Plantain can be prepared as a tincture, infused oil, salve or poultice.  I remember my grandfather making spit poultices with plantain leaves to soothe my itchy mosquito bites when I was a child and I still use this method for on-the-spot relief of bites, scrapes and stings.

Infusing plantain oil & finished salve
Our favorite preparation is plantain salve, made by gently warming a mason jar of chopped plantain leaves and olive oil in a mini crock pot full of warm water for several hours, straining the leaves out, thickening the infused oil with beeswax, and adding Vitamin E as a preservative.  Essential oils and flower essences can also be added.  My partner and our son have neosporin allergy (as does 5% of the population) so plantain salve has been a wonderful alternative for them.  This is our family’s go-to first aid salve, and it’s helped us heal lots of everyday scrapes and some significant injuries.

An injured toe heals with plantain salve
A couple of years ago, I burned my palm on a frying pan, raising large water blisters on several of my fingers.  After cooling my injured hand with ice, aloe vera and a bit of  lavender essential oil, I applied plantain salve several times daily to treat the burn.  The blisters receded and my palm healed in about a week’s time with no scarring.  Most recently, our 23-year-old son, training for the TaeKwon-Do World Championships, tore a thick callous off the bottom of his big toe.  He applied plantain salve several times daily to ease the pain and help it heal.  The plantain helped stop the initial bleeding, and by the next day he reported that the pain was significantly reduced and the wound had stopped seeping.  By day 3 it showed the first regrowth of tissue.  In a little over a week it was completely healed over. He has no scarring.  Plantain salve was all he used to treat this injury.

When we take time to know the plants that live nearby, they can both simplify and enrich our lives.  I am so grateful for our relationship with the plantain in our yard.  Welcome some plantain into your life, and see how it helps you grow.

Tuesday, July 31, 2012

Saving Seeds for Food Independence


Lettuce blossoms and seeds
Lettuce is a common fresh food and very easy to grow.  It makes sense to allow a few lettuce plants to go to seed in the garden and claim your independence from purchased seed.  Saving lettuce seeds is an exercise in being present. Every few days, more golden blossoms ripen into fluffy parachutes, and a new batch of seeds is ready to fly. That’s when you have to be there!  Small-scale backyard production keeps you in touch with these big events.

Lettuce flowering stalk
Lettuce plants are beautifully contradictory beings.  They equip their seeds with parachutes to help them fly away on the wind, AND they ooze a sticky sap, latex, that temporarily glues the newly released seeds to anything that blunders through the lettuce patch, bruising leaves and stems.  These opposing traits ensure that the seeds can be carried by both wind and animals – very clever! I’ve been watching this year's seed production since late May, when it became too hot in my Kansas City garden for lettuces.  They love cool weather but grow tall and develop a very bitter flavor if the temperatures hit 90.  That single tall stem produces many tiny yellow flowers resembling mini dandelions, and the family resemblance is no coincidence since both plants are in the Asteracea family.

Lettuce seeds in bowl
Seed-saving guides describe lettuce seed harvesting as a complicated and messy process requiring bagging and various grades of mesh screen. In the sustainable backyard garden, it’s done easily and with no special equipment.  To harvest lettuce seeds, break off the fluffy-headed seed pods and keep them intact.  Back indoors, rinse the sticky latex off your fingers, then hold the seeds by the fluffy end and gently pull and twist the pod at the opposite end to release the covering from the individual seeds.  Brush the seeds into a bowl, let them sit on the counter for a day, then package in paper envelopes labeled with seed type and date. I harvested 5 grams of seed from a single lettuce plant, the equivalent of 5 seed packets in the store, for a savings of $10! Keep them in a cool, dry, dark place and your lettuce seeds will populate your garden during spring and fall for the next 3 years.  
 
When we set aside a few of our vegetable plants for seed production we’re one step closer to self-reliance through food independence. Imagine every yard with a small backyard garden and neighbors sharing produce, then trading seeds.  It seems beautifully contradictory but it makes perfect sense: true food independence achieved through neighborhood inter-dependence. I believe we can make this dream a reality, and the time is now.